


Trending In Appliances
Do you have an appliance that needs repair? Is the cost of a professional technician too much for your budget? DIY solutions provide a great way to save money by tackling common repairs on your own. Fix it Yourself: DIY Solutions for Common Appliance Repairs offers an easy-to-follow guide to tackle some of the most common repairs with confidence and success.
From learning how to clean out your refrigerator coils, fix dryer issues, or replace a washing machine belt – this article will give you all the tips and tricks needed to get the job done right without spending hundreds of dollars. With step-by-step instructions and detailed pictures, anyone can learn how to become their handyman in no time!
For those who are looking for ways to cut down costs while still keeping their home functioning properly, Fix it Yourself: DIY Solutions for Common Appliance Repairs is here to help. Don’t wait any longer; dive into these straightforward techniques today!
Definition Of Diy Repair
DIY repairs are a popular way of tackling home appliance issues without having to call in an expert. Do-it-yourself repair techniques can be used to fix various problems, from broken dishwashers to faulty refrigerators. Not only do DIY repairs save time and money, but they also offer the satisfaction of doing a job well done with one’s own hands.
Getting started on any repair project requires assessing the damage first. This means understanding what needs fixing and then deciding which tools and parts are needed for the repair job. To help with this process, there is plenty of expert advice available online, including tutorials that provide step-by-step instructions on how to complete different types of repairs. By researching these resources thoroughly, homeowners can get all the information necessary for making informed decisions about their DIY repair projects. With the right guidance, anyone can become proficient at repairing common appliances around their house! Ready to take on the challenge? Let’s start by assessing the damage.
Assessing The Damage
Before you even think about attempting any DIY appliance repair, it’s important to assess the damage. You’ll want to make sure you know exactly what needs fixing and how difficult or complex a fix is likely to be. Here are some things you should consider before starting:
- Check for visible signs of damage or wear and tear.
- Identify what parts need replacing or repairing.
- Research whether replacement parts are available from manufacturers or third-party vendors.
- Determine if your home improvement skills match the repair job’s complexity.
Once you’ve assessed the situation, it’s time to get started with the actual repairs. If you’re new to do-it-yourself (DIY) home improvements, research online resources that provide step-by-step instructions on common appliance repairs like changing out filters, lubricating moving parts, cleaning clogged hoses, etc. There may also be instructional videos available that can help guide you through the process. It’s always best practice to follow manufacturer guidelines when performing appliance repairs at home to avoid further damages and potential safety hazards associated with unprofessional workmanship.
Ready for the next step? Safety considerations will play an important role in ensuring the successful completion of your DIY project.
Safety Considerations
Now that you have identified the common problems with your appliance, it’s time to take safety considerations into account. Before beginning any repairs or maintenance on your appliances, make sure you are taking extra precautions to prevent accidents and injury. Unplug all appliances before beginning work and wear protective equipment such as gloves and glasses when using tools. When dealing with electrical wiring, use caution to avoid electric shock. Additionally, read the manufacturer’s instructions for proper procedures and follow them carefully.
Additionally, be aware of things like gas lines when making home repair hacks yourself. If you’re not confident in working with gas lines or other types of potentially dangerous machinery pieces, then consider finding a professional who specializes in appliance maintenance instead. That way, you can save money without risking injury or damaging your property further.
It’s important to be mindful of these safety concerns before diving into DIY solutions for common appliance repairs. As long as you remain vigilant about following all necessary protocols while keeping an eye out for potential risks associated with home repair projects, then there is no reason why you shouldn’t feel comfortable tackling some simple fixes around the house by yourself. Now that we’ve discussed safety considerations let’s move on to discussing the tools and supplies needed to complete various tasks related to appliance repairs and maintenance.

Tools And Supplies Needed
For most appliance repairs, it’s important to have the right tools and supplies. Whether you’re a handyman or an amateur DIYer, having the proper equipment is essential for successful repairs. Here are some of the items you’ll need on hand:
| Tools & Supplies | Purpose | Examples |
| Screwdrivers | Removing screws | Slotted/Phillips-head |
| Pliers | Gripping/turning nuts and bolts | Needle-nose/slipjoint |
| Socket Wrenches | Turning more complex fasteners | Metric/imperial sizes |
| Allen Keys | Tightening small hexagonal fasteners | 1mm – 10mm sizes |
| Voltmeter | Measuring electrical current | Multimeter |
Using these tools and supplies can help make any repair job easier with fewer headaches. Not only that but using them correctly also ensures safety when dealing with electricity. Additionally, being aware of energy efficiency tips like unplugging appliances before making any adjustments can lead to sustainable living practices in your home. All this will save time and money while helping preserve our planet for future generations through green living habits. Knowing what kind of materials to use for specific jobs will ensure success when tackling common appliance repairs.
Troubleshooting Basics
Now that you have the necessary tools and supplies, it’s time to begin troubleshooting. Before tackling an appliance repair project, there are some basic steps you should take to ensure a successful fix. First off, make sure the appliance is unplugged from the power source before opening any panels or making repairs. This will prevent electrical shock and accidents. Additionally, check for visible signs of damage such as cracks or loose wiring. If these damages exist, they may need to be addressed before being able to properly diagnose the issue at hand.
The next step in your DIY journey is learning how to identify potential problems with your appliances by using diagnostic tests and manuals. Diagnostic tests show what components within the appliance might be malfunctioning while manuals help explain how each component works together to create efficient operation of the machine. Gathering this information can provide valuable insight into how best to proceed with a repair job.
Once all safety precautions have been taken and the problem has been identified, it’s time to get started with the actual repair process! With the knowledge gained from reading through manual instructions and testing various parts of an appliance, fixing it yourself becomes much easier than expected – allowing you to save money and gain satisfaction from completing your projects! As you move on toward refrigerator repairs, remember: to stay safe and remain confident in your abilities; anything else is just icing on top!
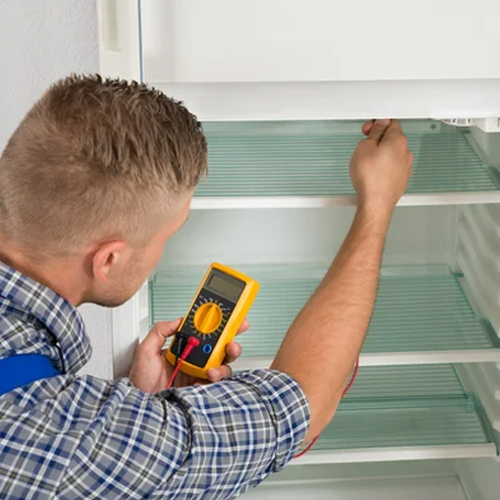
Refrigerator Repairs
Refrigerator repairs can be daunting and costly, but with a bit of know-how, they don’t have to break the bank. First, determine if there’s an issue with the power supply or cooling. If it’s the former, check that the appliance is plugged in correctly – easy mistakes like this are common! If it’s cooling issues you’re experiencing, your refrigerator may need to be defrosted. This involves removing all food items from inside and unplugging the unit before thawing any ice buildup manually or using a hairdryer on low heat. A combination of both methods is also effective.
Next up: stove/oven repairs. Stove and oven repair requires more technical knowledge than refrigerators, so having some prior experience with home appliances is helpful when attempting DIY fixes.
Stove/Oven Repairs
When it comes to stove and oven repairs, the first step is troubleshooting the problem. If you’re experiencing an issue such as inconsistent temperatures or inadequate heating, there could be a variety of issues at play, and knowing what these are can help you determine how best to proceed with your repair. Fortunately, many common problems associated with stoves and ovens can usually be solved without needing professional help.
If your stove won’t heat up properly, one possible cause may be that its elements need replacing. This is often easily done by removing the screws on either side of the element before disconnecting any wires, then replacing them with new ones. Inspecting the wiring for signs of damage or fraying will ensure that no further problems arise in the future due to poor connections. Additionally, clearing out debris from the burner area might also solve this issue if something is blocking the airflow around the elements.
Another possibility is that your flame isn’t igniting at all; this could mean an obstruction within the pilot light tube needs removing which requires some dismantling but should still be able to do it yourself. After identifying where the blockage lies (usually near the gas valve) carefully remove it using a stiff wire brush before reassembling everything back together again and testing for functionality.
With these DIY solutions at hand, tackling commonplace problems relating to stove and oven repairs doesn’t have to give too much trouble – just remember safety first! Next up we’ll look into washer/dryer repairs so keep reading to explore more tips and tricks!
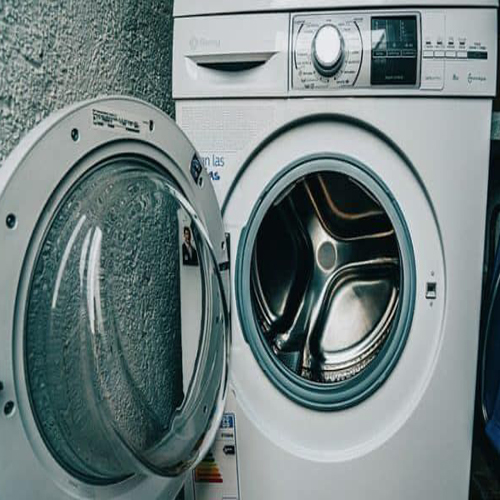
Washer/Dryer Repairs
Repairing a washer or dryer can be an intimidating task, but with the right tools and know-how, it can often be done without professional help. Before getting started, make sure that you have all of the necessary parts so that your repair is successful. Check to see if any wires need replacing or clamps need tightening before beginning work on either appliance.
Once you’ve gathered everything needed for the job, take off the back panel from both appliances. Make sure to disconnect the power before doing this! Inspect any hoses or belts for signs of wear and tear, as these may need to be replaced for the repair to be effective. If there are issues with water draining properly or clothes not drying correctly, check for blockages in pipes or filters respectively.
With some elbow grease and patience, most washer/dryer repairs can easily be completed at home. Once you have taken care of the problem areas, put everything back together and test out your repaired machine! Any issue should now be resolved. Moving forward, regularly cleaning lint traps and checking hoses will reduce the chances of further breakdowns occurring down the line.
Regular maintenance is key when it comes to tackling common dishwasher repairs – let’s explore what steps should be taken next…
Dishwasher Repairs
Dishwasher repairs can be a daunting task for many homeowners. Fortunately, there are some basic steps you can take to try and repair your dishwasher yourself before calling in a professional. First, check that the power supply is working properly by checking if all of the connections are secure and if any fuses have blown. If everything looks good, then it’s time to start troubleshooting the problem. Common causes of dishwashers not cleaning properly include clogged filters or spray arms, too much detergent being used, incorrect water temperature settings, or faulty heating elements. All of these issues can be fixed relatively easily with just a few tools and supplies.
If your dishwasher isn’t draining properly or leaving dishes wet after washing, this could indicate that something is blocking the drain hose or pump assembly. To solve this issue, try removing any visible blockages from the filter screen at the bottom of the unit before examining the drain hose itself for kinks or bends that may need straightening out. Additionally, make sure nothing has been placed on top of the dishwasher as objects could potentially obstruct drainage flow.
Once you’ve eliminated potential mechanical problems with your dishwasher, consider whether changing how you load dishes into it might help improve performance. Placing plates securely on their edges rather than flat helps ensure they get cleaned more efficiently while also reducing wear and tear on other items such as glasses and cutlery due to contact with them during washing cycles. With a few simple fixes like these done yourself at home, likely, your dishwasher will soon be running smoothly again! Ready to move on to microwave repairs?
Microwave Repairs
Moving on from dishwasher repairs, microwave repairs can be just as daunting. However, with a few tools and some knowledge of your appliance, you can easily have it working again in no time. The first step to tackling any repair is to unplug the power cord for safety reasons. Then remove the exterior cover of the machine; this will allow access to most components inside the unit. Once that’s done, take a look at all of the visible wiring and check if anything looks loose or frayed. If so, use electrical tape to secure them back into place. Additionally, check if there are any blown fuses and replace them according to manufacturer guidelines if needed. Lastly, inspect any other internal parts like fans or motors to make sure they’re free of dust and debris. If everything appears to be functioning properly then reinstall the outer housing before plugging it back into an outlet and testing it out. With these steps taken, your microwave should be running smoothly once more! Next up we’ll discuss garbage disposal repairs – another important task for keeping appliances in optimal shape.
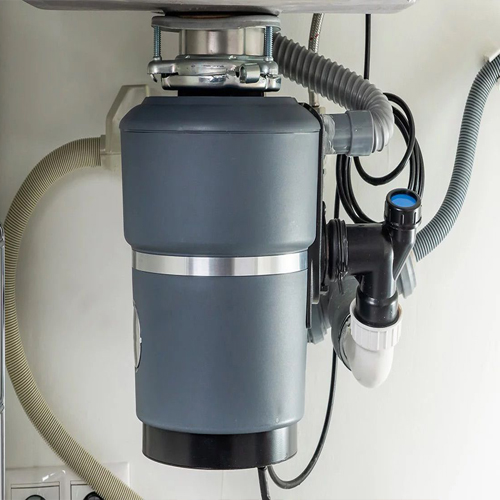
Garbage Disposal Repairs
Garbage disposals are a convenient way to dispose of food scraps, but when they break down, it can be incredibly frustrating. Luckily, many common garbage disposal problems have simple solutions that don’t require professional help — allowing you to fix the problem yourself.
- Use a hex wrench to make sure all parts inside the disposal unit are tightened properly
- Unclog any blockages with an Allen key or plumber’s snake
- Make sure there is no object lodged in the blades of your disposal
If these steps fail to solve the issue, it may be time to call a qualified technician for assistance. After checking and verifying all potential DIY options, if the appliance still won’t work as expected; then seeking professional advice is recommended. With correct guidance and knowledge on how to repair them safely and efficiently, technicians can get your garbage disposal running like new again! As you move on to fixing other appliances around your home such as air conditioners, remember that prevention is usually better than cure – regular maintenance will save much more money in the long run.
Dealing With Electrical Issues
When dealing with electrical issues in your home appliances, it is important to take safety precautions. Before attempting any repair, you should make sure that the power source has been safely turned off and unplugged. Below is a table of common electrical issues and possible solutions:
| Issue | Solutions |
| Short circuits or faulty wiring | Check for loose wires or damaged insulation; replace them if necessary. |
| Tripped circuit breakers | Reset the breaker by flipping the switch up and down. If the problem persists, contact the electrician. |
| Blown fuses | Replace the fuse with the same type/size as the original parts; reset the breaker switch if necessary. |
It is critical to assess the complexity of an issue before deciding whether or not to attempt a DIY fix yourself. In some cases, such as when making repairs on hard-wired connections or gas lines, it is best to seek professional help from experienced technicians who can ensure safety standards are met during the process.
Hiring A Professional
Hiring a professional for appliance repairs can be beneficial in some situations. A licensed technician will have the necessary skills and experience to identify and diagnose problems correctly, as well as access to any specialized tools or parts needed for repair. Depending on the type of problem and its complexity, it may also save time compared to attempting DIY solutions. However, this comes with an added cost that should be taken into consideration when assessing options.
When hiring a professional for appliance repairs, research reputable companies ahead of time by reading customer reviews online. Ask questions about rates, licensing, warranty coverage, and guarantee policies so you know exactly what to expect before signing anything. If possible, get estimates from several different sources to compare pricing and services offered. SK is the nearest appliance repair service company if you are in Washington DC.
Before allowing anyone inside your home or business premises, verify their identity and credentials first; most trustworthy professionals should gladly provide these upon request. Once hired, keep clear records of all interactions including payment receipts and invoices in case there are further issues requiring attention down the line.
Conclusion
In conclusion, DIY appliance repair can save you time and money if you know what to do. It’s important to assess the damage and determine if it is a problem that requires professional help or something you can handle yourself. As long as you take safety precautions, have the right tools and supplies on hand, and understand basic troubleshooting techniques, many home repairs are within your reach.
Still, some repairs may be more complex than others and require specialized knowledge beyond your comfort zone. In those cases, don’t hesitate to call in an expert who has the skills and experience to get the job done safely and efficiently. With a little research, practice, and confidence in your abilities, tackling DIY appliance repairs could become one of your favorite hobbies!