
Trending In Refrigerators
Refrigerators are an essential part of everyday life, providing us with the ability to store and preserve food. As such, when a refrigerator fails it can be inconvenient at best and costly at worst. Fortunately, many common appliance repairs for refrigerators can be done by a homeowner with some basic knowledge of appliances. In this article, expert tips on how to repair your refrigerator will be discussed in detail so that you may save time and money without sacrificing quality or safety.
The most important part of any successful DIY job is having the right tools and materials available before beginning any work. It is also beneficial to have a complete understanding of the appliance’s design before starting the repair process. This way one may accurately identify which components need replacing or repairing to get their refrigerator back up and running quickly and efficiently while keeping costs down.
In addition to being well-equipped, certain steps should always be taken regardless of the type of repair being undertaken. These include disconnecting power from both sides as well as ensuring proper ventilation during all stages of repair. Adhering to these guidelines ensures that no further damage will occur due to improper handling or lack of expertise. Now let’s take a look at some popular refrigerator repairs that can be done safely and effectively by homeowners themselves!
Understanding Refrigerator Basics
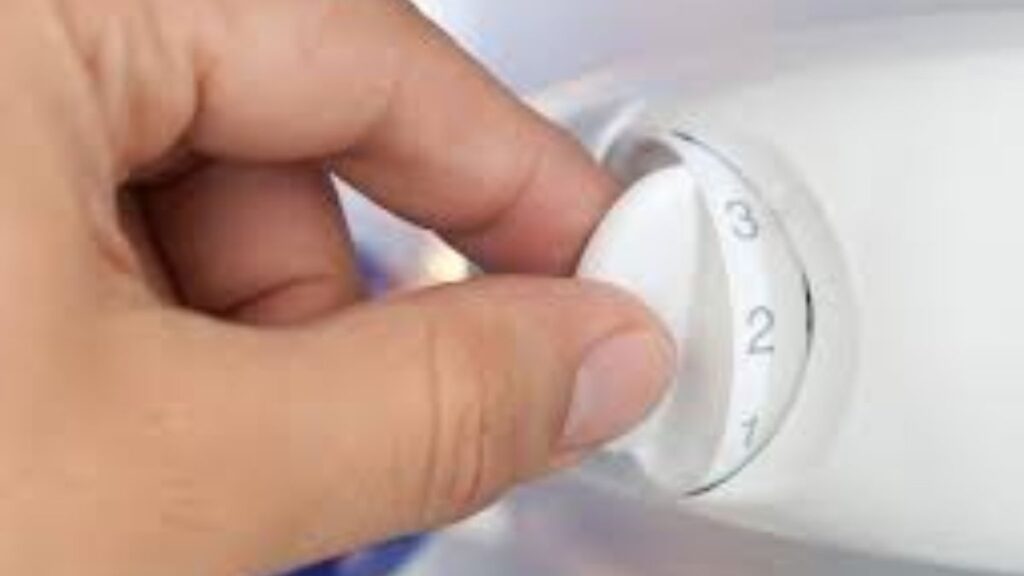
Before attempting any DIY refrigerator repair, it is essential to understand the basics of how a refrigerator operates. Knowing the fundamental principles behind fridges helps diagnose issues and allows for informed decisions when repairing them. The refrigerator temperature should be set between 37°F and 40°F to maintain optimal food storage conditions. Measuring humidity levels, either with a hygrometer or thermometer/hygrometer combination device, can also help determine if any changes need to be made regarding temperature settings.

Safety precautions must always be taken before beginning repairs on refrigerators. When working near condenser coils it is important to turn off power at the circuit breaker or unplug the unit from its power source before cleaning or inspecting components; otherwise, electric shock may occur. Additionally, wear appropriate eye protection and gloves as these areas often contain sharp metal fins which can cause injury if not handled properly.
To ensure successful DIY appliance repairs for refrigerators it’s essential to have a thorough understanding of how they work, including an awareness of proper temperatures, measuring humidity levels, and following safety procedures around condenser coils. With this knowledge in hand, identifying problems becomes much easier.
Identifying The Problem
Refrigerator repairs can be complex and require a thorough assessment to accurately diagnose the problem. Fortunately, some common refrigerator issues can often be resolved without having to call a repairman. Identifying the issue is the first step when attempting any DIY appliance repair. The following steps will help homeowners identify faults with their refrigerators:
- Check for power – Make sure that the outlet you’re using is working properly by plugging another device into it. Additionally, check your home’s circuit breaker box if necessary.
- Inspect temperature settings – Ensure that your refrigerator’s temperature setting is appropriate and not set too low or high. This can be done by accessing the temperature controls inside of your fridge, which typically features an adjustable dial or digital display panel.
- Listen for strange noises– Unusual sounds coming from your fridge could indicate a faulty motor or compressor, two components essential for cooling food efficiently. If these parts malfunction, they should be replaced immediately as running them while damaged may put a strain on other components and cause further damage down the line.
- Observe ice buildup – Ice accumulation around the seal of a door indicates that warm air is entering and causing items to spoil faster than usual due to an inefficient seal around the door itself. This can easily be fixed by replacing worn-out gaskets with new ones purchased at most home improvement stores or online retailers specializing in appliance parts and accessories.
Identifying potential problems requires careful observation and attention to detail before attempting any kind of repair work yourself; however, once one has identified the fault correctly they are well on their way towards finding a solution through troubleshooting tools and materials available on the market today
Troubleshooting Tools And Materials
When performing DIY refrigerator repairs, it is important to have the proper tools and materials on hand. This section will provide a list of necessary troubleshooting tools as well as parts for common refrigerator repairs.
| TROUBLESHOOTING TOOLS | APPLIANCE PARTS |
| Screwdrivers | Hinges |
| Pliers | Handles |
| Flashlight | Gaskets |
| Multimeter | Seals |
| Wrench | Filters |
It is also recommended that you consult your owner’s manual or contact an appliance repair technician before attempting any major repairs. Knowing what type of fridge you own can help identify the right parts needed for the successful completion of the job. Additionally, when purchasing replacement parts, make sure they are compatible with your specific model of refrigerator.
Having all these items readily available will not only save time but minimize potential damage to your unit during the process of Refrigerator repair. With this information in mind, you should be able to tackle most minor problems associated with refrigerators confidently and successfully.
Cleaning And Maintaining Your Refrigerator
Cleaning and maintaining your refrigerator is an important part of keeping it running efficiently. Regularly inspecting the interior and exterior of your fridge will alert you to any issues that may need to be addressed, such as dirt buildup or malfunctioning parts. To ensure optimal performance, here are some DIY tips for cleaning and maintenance:
- First, make sure you clean the outside of your refrigerators regularly with a damp cloth. This will help keep dust from gathering in hard-to-reach areas and prevent it from entering the interior components. Additionally, check if there’s any visible damage on the appliance’s outer casing – this could indicate a potential problem with its operation.
- Next, focus on cleaning the inside of your refrigerator by removing all food items first and checking the expiration dates on each item before putting them back into place. Make sure to also wipe down shelves and drawers with warm water and mild detergent periodically. If there is stubborn grime build-up, use a soft brush or sponge to gently scrub away at these spots before wiping dry with paper towels or a lint-free cloth.
- Finally, take out anything blocking air vents so cool air can flow freely throughout the space without obstruction.
Owners of fridges must practice proper maintenance; this includes routinely checking for blockages that may impact cooling efficiency, ensuring seals around doors remain tight for effective temperature regulation, as well as replacing worn-out gaskets when needed. Doing these simple steps can go a long way in protecting both the longevity of your appliance and the safety of those who use it! Moving forward, we’ll discuss how to troubleshoot common problems associated with refrigeration systems…

Checking For Blockages
When diagnosing a refrigerator, checking for blockages is an integral step. Blockages can impede the flow of coolant and lead to temperature irregularities in the appliance. Troubleshooting blockage-related issues should be done before attempting more complex repairs such as replacing thermostats or fuses.
The most common causes of blockages are dust buildup, dirt accumulation, or foreign objects obstructing the cooling system. To check for these types of blockages,
- first, unplug your refrigerator from its power source.
- Next, carefully inspect all air vents on the back and sides of the unit using a flashlight.
- Look for any debris that could be causing a clog and remove it with tweezers if possible. Additionally, make sure there is enough clearance around the back and side panels so that airflow isn’t blocked by furniture or other items near the refrigeration unit.
- If you find significant amounts of dust blocking the vent openings or inside grills, use a vacuum cleaner attachment to clean them out thoroughly.
- Make sure to wear protective gloves when doing this work as some parts may contain sharp edges or hazardous materials like mercury vapor which can be toxic if inhaled.
- Once you have checked for visible signs of blockage repair, plug in your refrigerator again and see if it has resumed normal operation. If not, proceed to replace thermostats and fuses to investigate further potential problems with your appliance’s cooling systems.
Replacing Refrigerator Thermostats And Fuses
Replacing a refrigerator thermostat and fuse is one of the most common DIY repairs for refrigerators. A thermostat regulates the temperature inside the appliance, while a fuse helps protect it from power surges. Knowing how to replace these components can save you time and money in hiring a professional repair service.
To replace a thermostat:
- first, locate where it’s installed on the back panel or side wall of your fridge.
- Unplugging the refrigerator beforehand is recommended.
- Take out the screws that secure the old thermostat, pull off its wiring harnesses, then remove it completely. You should be able to slide in your new DIY thermostat with no problems;
- if not, check for any obstructions inside the casing before proceeding further.
- Make sure all wires are connected correctly and secured tightly with electrical tape before plugging them back into your refrigerator.
- Fuse replacement requires disconnecting both ends of this component to prevent electric shock hazards. Once unplugged, unscrew the existing fuse and install your new one following manufacturer instructions exactly as stated.
- When reassembling parts afterward, remember to double-check connections several times over before turning on the power again to ensure everything works properly without issue.
It’s important to note that when replacing either part yourself, always use original equipment manufacturer (OEM) replacements whenever possible for safety reasons.
Replacing Fridge Door Seals And Gaskets
Replacing door seals and gaskets on a refrigerator can be an easy DIY repair. Here are some steps to guide you through the process:
- Preparing for Repair:
- Unplug the refrigerator from the power source.
- Gather all necessary tools, such as screwdrivers, pliers, putty knives, or other sharp instruments, for removing the old seal/gasket.
- Clean the area around the seal/gasket with a damp cloth before beginning repairs.
- Replacing Door Seals/Gaskets:
- Carefully remove the old seal/gasket using a putty knife or similar tool.
- Measure the new replacement seal against the opening of the fridge door. Trim if needed so it fits in place snugly but not too tight that it will damage rubber material when installed.
- Install new replacement seal by pressing firmly into position until secure fit is achieved without any gaps along edges of seal/gasket.
Following these steps should have your refrigerator running smoothly again with properly sealed doors that help keep cold air inside while keeping warm air out. This can save energy costs over time and ensure proper temperature regulation within the appliance’s interior space at all times. Additionally, this simple repair project may also prevent potential moisture build-up which could lead to mold growth and unpleasant odors emanating from your fridge – both health risks to consider avoiding! Transitioning now to diagnosing compressor problems…
Diagnosing Compressor Problems
In the repair of refrigerators, compressor diagnosis is a very important step. Compressors are responsible for maintaining proper temperature and ensuring optimal operation of the refrigerator’s cooling system. Troubleshooting a faulty or malfunctioning compressor requires careful assessment of several factors.
| NOISE | TEMPERATURE |
| Humming/buzzing sound from the compressor | Freezer temperature warmer than normal setting |
| Vibrating noise coming from the back of the fridge | The refrigerator is too warm even when set to the lowest temperature |
Compressor Problems
When diagnosing a problem with a refrigerator compressor, certain signs can help identify the issue. One symptom could be an audible humming or buzzing sound emanating from the compressor itself – this indicates that it may need to be replaced due to damage or wear and tear over time. Additionally, vibration in or around the area where the compressor is located can also indicate problems; often if left unchecked these issues will escalate into more extensive repairs. If you notice your freezer is getting warmer than its usual settings, or your refrigerator isn’t reaching cold temperatures even when set to its lowest setting, then these could both point to possible issues with the compressor as well.
By taking note of any odd noises or changes in performance related to your refrigerator’s cooling mechanism, it is possible to quickly diagnose potential problems early on and make necessary repairs before further damages occur. With some knowledge about how compressors function and what signs suggest they may require attention, you can ensure your appliance runs correctly at all times without having to call in expensive professionals every time something seems amiss.
Repairing Icemakers
Icemakers are an important part of a refrigerator, especially when it comes to keeping food and drinks cold. As such, when they malfunction or stop working altogether, homeowners should address the issue as soon as possible. Fortunately, many icemaker repairs can be undertaken by the homeowner with minimal tools. Before beginning any repair work, however, proper safety precautions must always be taken for personal protection – gloves, goggles, and other necessary equipment should be worn at all times during the repair process.
Common problems associated with ice makers include clogged lines, frozen shut parts, and faulty water valves. When troubleshooting these issues, it is important to consider if something is blocking the flow of water from entering the unit. If this appears to be the case then defrosting may need to take place to clear away any residue that has built up inside. Additionally, replacing old or damaged parts could help improve performance and efficiency. This includes checking the thermostat and timer settings on the unit itself to ensure their accuracy.
In some cases, attempting DIY ice maker repairs may not bring about satisfactory results due to the complexity of the appliance’s internal components or lack of skill on behalf of the individual attempting them; therefore seeking professional assistance might be a wise decision to avoid further damage or injury occurring while undertaking repairs oneself.
Seeking Professional Assistance
When the DIY methods of troubleshooting and repairing a refrigerator prove unsuccessful, it is time to call in a professional. A local repair specialist can be found with relative ease by searching online for appliance repair services. It may also be helpful to read customer reviews before selecting a service provider. The cost of hiring a professional should be weighed against any potential damage that could result from an incorrect repair.
In some cases, seeking professional assistance may represent the most cost-effective solution when encountering major issues with refrigerators or other appliances. Repair specialists have access to specialized tools, knowledge about various manufacturers’ products, and years of experience in dealing with common appliance repairs. In addition, they are often able to diagnose problems more quickly than individuals who lack such expertise.
Regardless of whether one chooses to take on a refrigerator repair or opts for professional help, it is important to remember that being informed will go a long way toward ensuring successful results. Learning how best to use the resources available can save time and money while helping preserve the quality and lifespan of appliances over time.
Conclusion
Concluding, DIY refrigerator repairs can be relatively simple if one is equipped with the right knowledge and tools. When attempting to fix an issue within a refrigerator, it is important to understand the basics of how refrigerators work, as well as what components are responsible for performing specific functions. Additionally, troubleshooting should begin with basic maintenance such as cleaning and checking for blockages before moving on to more complex tasks like replacing door seals or diagnosing compressor problems. If all else fails, seeking professional assistance may be necessary to ensure that any repairs made are done correctly and safely. With thorough preparation and research, most people can successfully tackle common appliance repairs related to their refrigerators without needing extensive outside help.